This is part 3 of the vCenter 6.7 High Availability setup series. If you haven’t already, go check out vCenter 6.7 HA Setup - Part 1 to get an introduction and understand some of the requirements. In vCenter 6.7 HA Setup - Part 2 of this series, we configured vCHA with the automatic clone creations, and in this post we are going to configure vCHA manually (Advanced).
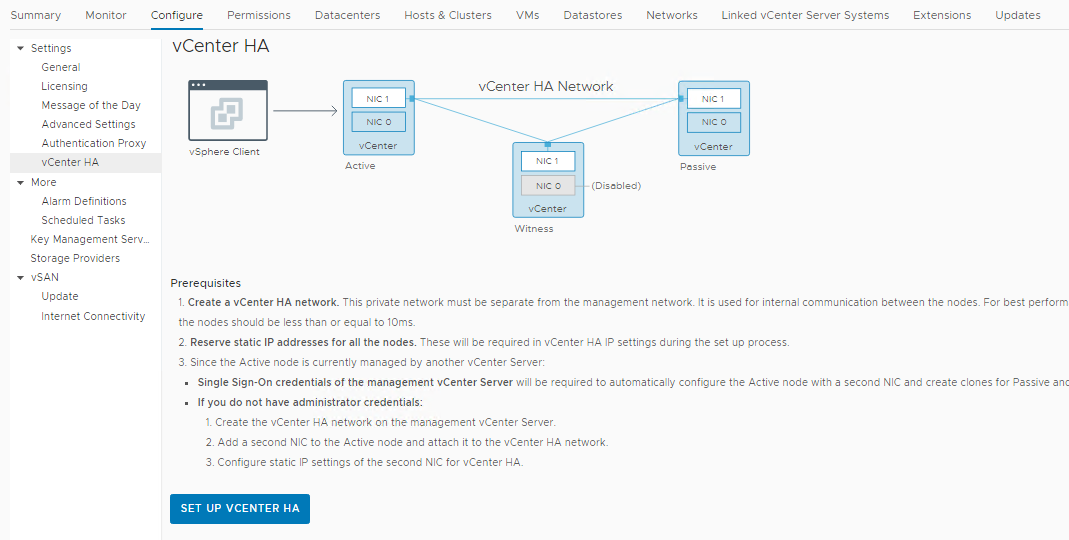
Configure vCenter HA
Log into the vSphere client and click the Configure tab and vCenter HA. The vCenter HA summary page is displayed with a list of prerequisites, ensure these are met along with the requirements above. Click Setup vCenter HA.
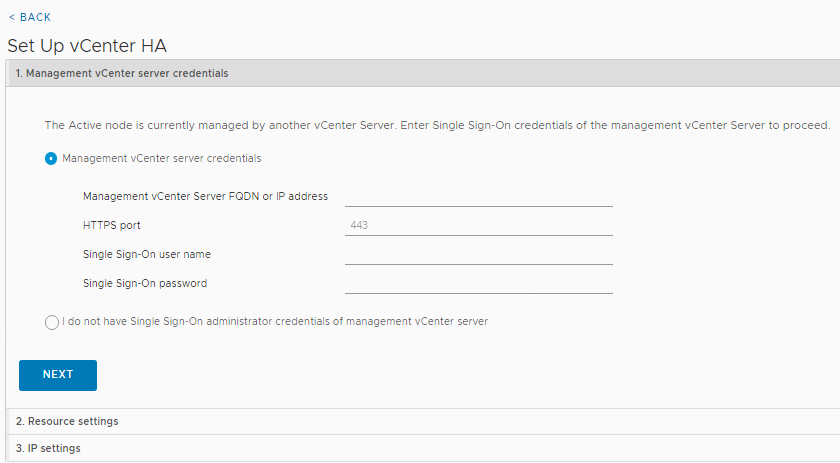
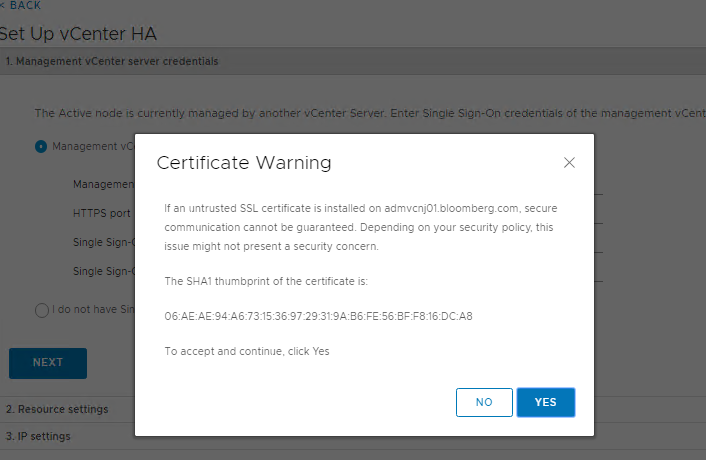
Enter the Management vCenter Server, which could be itself if you’re self-managing. Typically, you won’t change the HTTPS port. Enter the SSO username and password combination and Click NEXT. Click YES to accept the Certificate Warning.
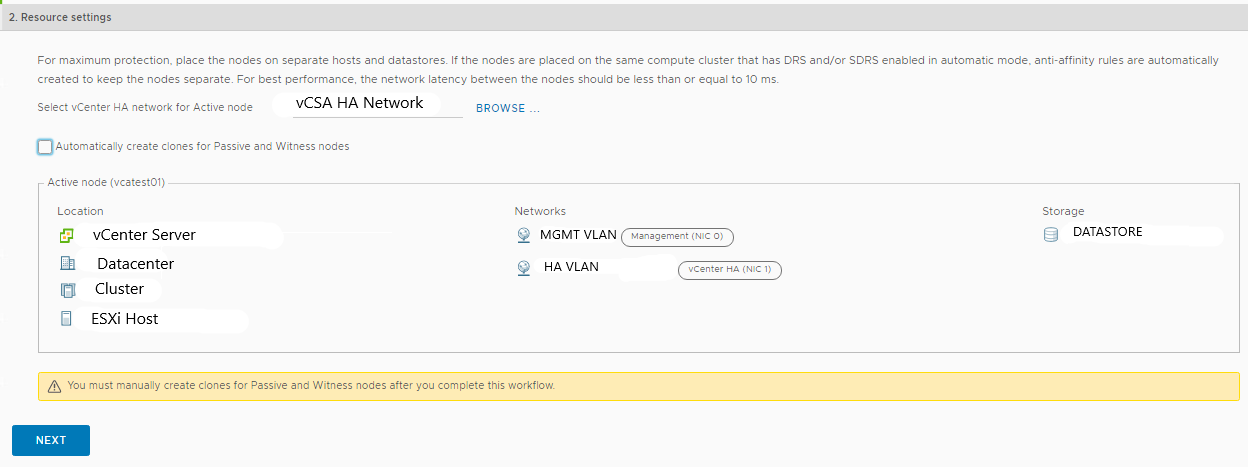
In MOST scenarios, you will select the Basic option - Automatically create clones for Passive and Witness nodes. To see my post on that, go check out vCenter 6.7 HA Setup - Part 2.
We are going to uncheck the box to “Automatically create clones”. Click NEXT.
On the IP settings page, we need to enter the HA network settings for the active, passive, and witness nodes. Click Finish. Keep in mind that these are the NIC1 (HA Network) settings. If you’re doing this advanced setup, more than likely you are stretching the vCHA across to another Datacenter. IF you want the Passive vCenter to have the same IP when a failover occurs, you do NOT need to click into “Edit Management Network Settings”. Click FINISH. IF you do NOT have a stretched Layer 2 network, meaning you can have VMs with the same IPs in multiple Datacenters, we need to click on “Edit Management Network Settings”. Here, we will enter the IP information we want to give to the vCenter should a failover occur. We will also need to have DNS setup for this (A record and PTR record).
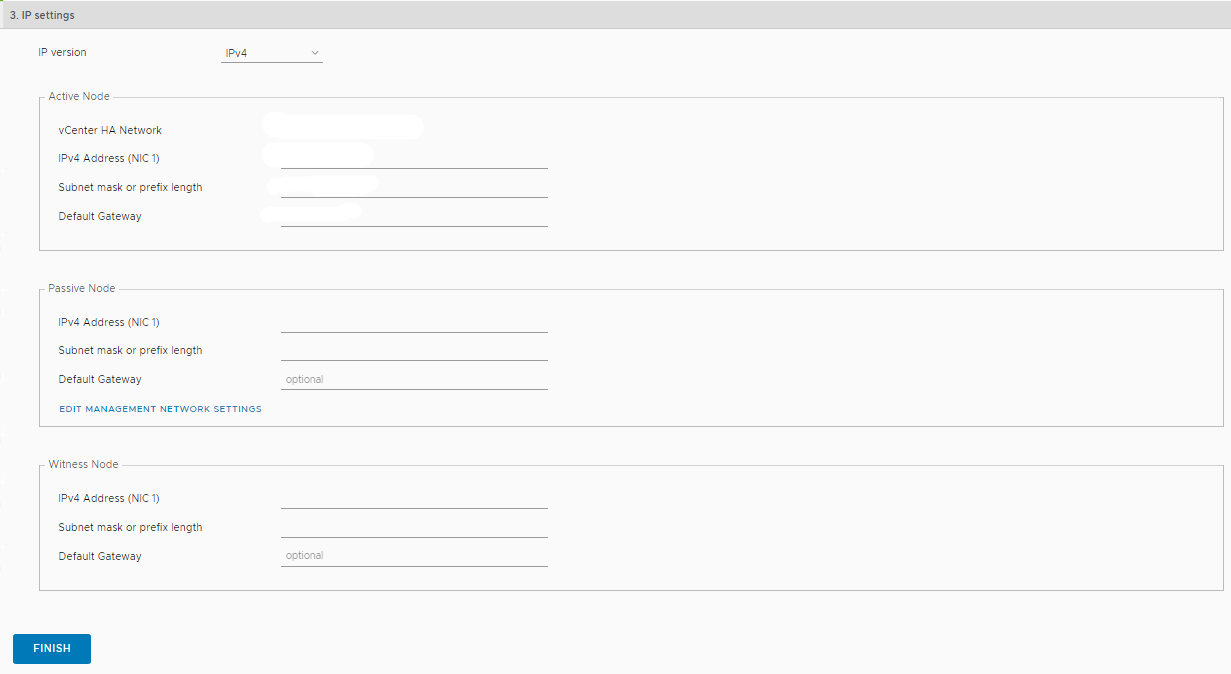
Do NOT click FINISH just yet. We need to manually clone the Active node, twice. Instead of writing the cloning process for VMs, I’m going to take an snippet from VMware’s KB Article.
Clone a Passive Node
- From Management vCenter Server, clone the Passive Node from the Active Node customizing the. Provide a name for the virtual machine (for example: vcha-peer).
- Select the Cluster, ESXi host, and datastore for the Passive node.
- Select Customize the Operating System and Power on virtual machine after creation and click Next.
- Select the Create New Customization Specification icon and provide a name (For example: vcha-passive-spec).
- Complete the wizard with the information gathered earlier.
Notes: The Computer Name must be the same as Active node’s hostname/DNS hostname and the Domain name must be specified separately. Ensure to choose the same Time Zone as vCenter’s Active node. Clone customization defaults the NIC1 and NIC2 IP addresses to DHCP. These will need to be changed to static and the IP’s gathered earlier entered.
- Click Finish.
- Select the newly created Customization Specification from the list and click Next.
- Review the settings and click Finish to begin the clone operation of the Passive node
Clone a Witness Node
- From Management vCenter, clone and customize the Witness from the Active Node. Provide a name for the virtual machine (for example vcha-witness).
- Select the Cluster, ESXi host, and datastore for the Witness node.
- Select Customize the Operating System.
Note: Do not select Power on virtual machine after creation this time.
- Click Next and select Create New Customization Specification and provide a name (for example, vcha-witness-spec)
- Complete the wizard with the information gathered earlier.
Notes: The Computer Name must be the same as Active node’s hostname/DNS hostname and the Domain name must be specified separately. Ensure to choose the same Time Zone as vCenter’s Active node. Witness nodes do not use the Management NIC and it will not need to be configured. Edit the vCenter HA Network interface and provide the same info as provided during vCenter HA configuration wizard.
- Click Finish.
- Select the newly created Customization Specification from the list and click Next.
- Review the settings and click Finish to begin the clone operation of the Witness node.
- Optional: Once the Witness node has finished cloning, edit the settings of the virtual machine and lower the vCPU count to 1 and the Memory to 512MB. This will save resources in the cluster and will not affect the performance of the vCenter Server.
- Power on the Witness Node virtual machine.
Once the nodes are UP, we will set the static routes ([Route]) section manually in /etc/systemd/network/10-eth1.network. Here is what it looks like in my configuration.
I didn’t have to add a Static route on the Active node to the Witness because they were in the same Datacenter. Only the Passive node was in a secondary site.
On the Active node, edit the /etc/systemd/network/10-eth1.network file and add the following lines:
# Static route to HA interface of Passive
[Route]
Gateway=10.124.155.1
Destination=10.124.11.2/32
On the Passive node, edit the /etc/systemd/network/10-eth1.network file and add the following lines:
# Static Route to Primary Node
[Route]
Gateway=10.124.11.1
Destination=10.124.155.2/32

# Static Route to Witness Node
[Route]
Gateway=10.124.11.1
Destination=10.124.155.3/32
On the Witness Node, edit the /etc/systemd/network/10-eth1.network file and add the following lines:
# Static route to HA interface of Passive
[Route]
Gateway=10.124.155.1
Destination=10.124.11.2/32
Once we can confirm the routes are correct, you can restart the vCSA networking by running:
systemctl restart systemd-networkd
Test Port Connectivity in vCSA
Go visit vCenter 6.7 HA Setup - Part 1 for the list of the port requirements on the HA network.
Run this command on the vCenter Server Appliance: curl -v telnet://IPADDRESS:PORT#
If the port connection is succesful, you will see:
# curl -v telnet://10.124.11.2:22
* Rebuilt URL to:telnet://10.124.11.2:22/
* Trying 10.124.11.2...
* TCP_NODELAY set
* Connected to 10.124.11.2 (10.124.11.2)  port 22 (#0)
SSH-2.0-OpenSSH_7.4
If the port is blocked or vCenter is not listening, you will see:
# curl -v telnet://10.124.11.2:23
* Rebuilt URL to:telnet://10.124.11.2:23/
* Trying 10.124.11.2...
* TCP_NODELAY set
* connect to 10.124.11.2 port 23 failed: Connection timed out
* Failed to connect to 10.124.11.2 port 23 failed: Connection timed out
* Closing connection 0
curl: (7) Failed to connect to 10.124.11.2 port 23 failed: Connection timed out
*** Bonus ***
Keep in mind that if Passive node becomes the Active node due to a Failover, you will have to have a DNS record in place to reflect this. This could be automated from the witness with some scripting ability. If I can make some time, I will create another post for that.
Don’t forget to create a DRS rule to separate the Active & Witness node if they’re in the same Compute Cluster.
In vCenter 6.7 HA Setup - Part 4, I will walk you thru the various vCHA maintenance and failover actions.